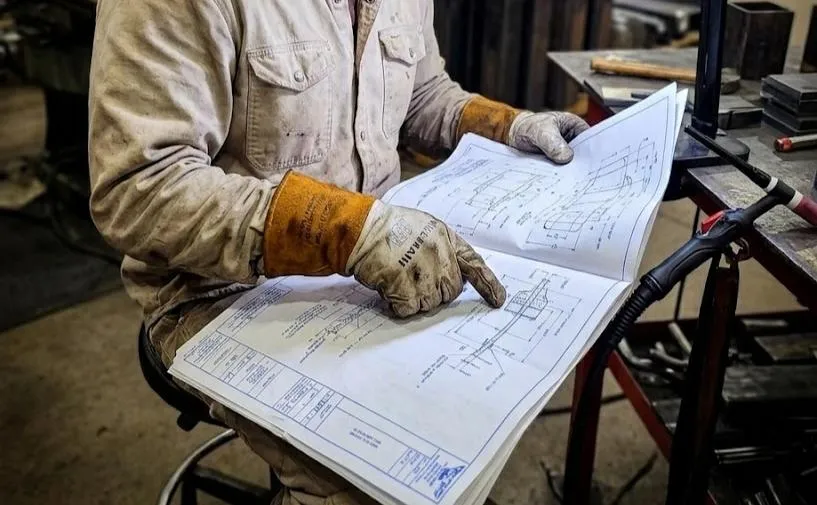
Blueprint Reading Secrets The 20% of Symbols That Show Up 80% of the Time
Blueprints can feel like a foreign language, but most fabrication jobs reuse the same small set of high-frequency symbols and notes. Master the core blueprint reading elements below, and you will understand the majority of what shows up in weld shops, pipe work, and general metalwork.
Why the 80/20 Rule Works in Fabrication
Most drawings are repetitive because fabrication problems are repetitive. You have to identify the part, locate features, control size, control location, and then define the weld. That is why the same ideas keep appearing across structural frames and pipe supports, even when the project looks “new.”
A practical goal is not to memorize every rare callout. Instead, get confident with the few symbols that drive fit-up, cut length, hole patterns, and weld acceptance. After all, those are what affect rework and inspection.
The Core “Legend” in Blueprint Reading: Title Block, Notes, and Line Types
Start with the title block and general notes because they set the rules for the entire print. This includes units, tolerances, material, finish, and sometimes weld standard references. Fabricators skip this and then wonder why a part is right but still rejected.
Next, recognize common line types: object lines (visible edges), hidden lines (features you cannot see), and centerlines (axes for holes, radii, and symmetry). These are the rails everything else rides on, so misreading them can shift a hole pattern or flip a part.
Dimensions That Control Fit-Up: Size, Location, and Tolerance
Most shop problems come from confusing size and location dimensions. Size tells you “how big” (plate width, hole diameter, slot width), while location tells you “where” (hole center-to-edge, center-to-center spacing).
Pay attention to tolerances, even when they are only stated in a general note. A dimension without a tolerance is not “anything goes”; it is still governed by whatever the print’s default tolerance policy is, and that affects whether parts assemble without forcing, grinding, or field fixes.
A helpful habit is to circle the assembly-critical dimensions first: bolt-hole locations, mating face lengths, base-to-centerline heights, and anything that will stack across multiple pieces. Those are the dimensions that create areal-world mismatch when they drift.
Common Hole and Feature Callouts on Fabrication Prints
You'll encounter these callouts repeatedly because they communicate machining and layout work efficiently:
Diameter symbols and hole sizes (shown as Ø followed by a number) define round holes with precision. Use these to set up your drill press or call out hole locations to layout.
Center marks and centerlines establish the exact location of hole centers. These are essential for accurate layout and critical for inspection verification.
Radii, chamfers, and bevel notes specify edge preparation and corner relief. These callouts matter because improper edge prep compromises both fit and welding access.
Even if you are not the one running a mill, you still need to understand these callouts to prep parts correctly, check incoming pieces, and avoid welding something that will later need to be machined.

Welding Symbols: The Few Pieces That Matter Most
The most reused weld symbol anatomy is simple: arrow, reference line, and optional tail, with weld information attached to the reference line. The placement above or below the reference line is critical because it indicates which side of the joint gets welded.
Focus on these high-frequency weld symbol items first:
Begin by mastering the fillet weld symbol and its size callout. Fillet welds dominate structural and general fabrication work, making this the most practical symbol to learn.
Next, understand arrow-side versus other-side placement—the distinction between symbols positioned below or above the reference line. Misinterpreting this placement can lead to distortion, interference, or inspection failures.
Then learn to recognize both-sides indications, where symbols appear on both sides of the reference line. This notation significantly affects heat input, welding sequence, and access planning.
Finally, distinguish between field welds and shop welds, along with all-around style indications. These notations fundamentally alter your workflow, tooling requirements, and build staging strategy.
If you only learn one secret, learn this: weld symbols are not just about the weld type. They are instructions for planning, including access, sequence, and what must be completed before the assembly is closed up.
A Systematic Blueprint-Reading Workflow for Fabricators
Follow this repeatable process to catch critical details even under time pressure:
Start with the text. Read the title block, general notes, and all weld or inspection callouts. These set the rules for the entire job.
Orient yourself. Identify all views (front, top, side, section) and confirm their orientation before taking any measurements. A misread view costs time and material.
Flag critical dimensions. Highlight dimensions and tolerances that control mating parts and bolt-up fit. These directly impact whether the assembly goes together.
Study the welds last. Review weld symbols only after you understand the joint geometry. This sequence lets you visualize access and plan your welding order.
From Booth to Blueprint: Why Integrated Training Matters
Many welding careers stall because people can weld a decent bead but cannot interpret what the drawing is asking for, especially when symbols and notes stack up across multiple views. The American Welding Academy includes blueprint reading in its training, alongside hands-on welding and job preparation, so students build both booth skills and the ability to follow real work instructions.
If you are choosing between training paths, AWA’s Pipe Welding & Fitting and Fabrication Welding & Fitting courses are structured programs designed to prepare students for industry expectations, and both emphasize skills that translate directly to the shop floor.
Ready to transform your interest in welding into professional expertise? Explore our programs, connect with us online, or call (636) 800-9353 to learn more about enrollment, program details, and how AWA can help you launch a career that lasts.
