3 Progress Parkway, Union, Missouri 63084
Follow Us:
Learn. Build. Succeed.
Your Welding Journey Starts Here.
Welcome to the American Welding Academy Blog — your source for welding insights, training tips,
student success stories, and industry news. Stay informed, stay inspired, and keep building your future one weld at a time.
Reading Between the Lines A Beginner's Guide to Welding Blueprints
To grow in the welding trade, you need more than a steady hand and a good arc. You need to master welding blueprints. These technical drawings form the foundation of how engineers and fabricators communicate. They tell you exactly what to build, where to weld, and how to do it. Learning to read them early in your career delivers one of the most practical skills you can develop.
Why Welding Blueprints Matter
A welder who cannot read a blueprint is like a baker who cannot read a recipe. You might possess excellent skills, but you miss critical information. Blueprints eliminate guesswork. They keep your work consistent, accurate, and compliant with code.
In industrial shops, supervisors won't always stand over your shoulder explaining every detail. The drawing becomes your guide. The faster you learn to trust welding blueprints, the more independent and valuable you become on the job.
Breaking Down the Welding Blueprints
Every welding blueprint relies on a few core elements. Once you know what to look for, the page makes sense quickly.
You'll encounter these key components:
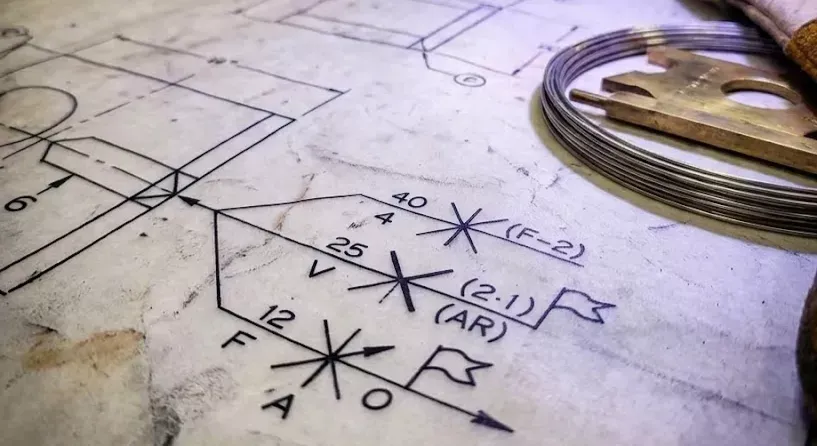
Reference line: The horizontal base of every welding symbol. It serves as an anchor for all welding instructions, including weld type, size, length, and process notes.
Arrow line: Points to the exact joint or surface where the weld goes.
Weld symbol: A simplified graphic placed on or near the reference line that identifies the weld type (fillet, groove, plug, and others).
Dimensions: Numbers positioned to the left and right of the symbol indicating weld size, length, and spacing.
Tail: Located at the end of the arrow; you use it to specify the welding process (MIG, TIG, Stick) or reference a note.
Supplemental symbols: These include indicators like "weld all around" (a circle at the arrow junction) or "field weld" (a flag symbol).
Reading a blueprint demands a step-by-step approach. Start at the reference line. Follow the arrow. Check the symbol type. Then examine the dimensions. With practice, this process becomes second nature.

Common Symbols in Welding Blueprints and What They Mean
Welding symbols each represent a different joint configuration or weld type. The American Welding Society (AWS) standardizes these symbols across the industry.
The most common ones include:
Fillet weld: Looks like a right triangle; fabricators use it for T-joints, lap joints, and corner joints.
Groove weld: Indicates a weld between two pieces with a prepared edge; variations include V-groove, U-groove, and bevel.
Plug or slot weld: A circle symbol; you use it when welding through a hole in one piece to join it to another.
Backing symbol: Appears as a rectangle below the reference line; it indicates that a backing strip supports the weld root.
Contour symbols: These additions show the finished surface shape, such as flat, convex, or concave.
Symbol placement determines direction. When symbols appear below the reference line, the weld goes on the arrow side of the joint. When they appear above the line, the weld goes on the opposite side. That single detail matters a great deal in fabrication.

Shop Math: The Real Differentiator
Here's something many beginners overlook. Reading blueprints isn't just about recognizing symbols. It also involves math.
"Shop math” refers to the applied arithmetic welders use on the job. This includes reading measurements, calculating angles, working with fractions and decimals, and understanding tolerances. It's not advanced algebra, but it is precise, and it matters.
Welders who are strong in shop math can work from drawings with minimal supervision. They can calculate material needs, check fit-up dimensions, and catch errors before they become costly mistakes. That level of competence gets noticed. It translates directly into more responsibility, more complex work, and stronger advancement opportunities. Accuracy on paper leads to quality in the field.
Where Blueprint Skills Fit Into Your Training
Blueprint reading isn't an advanced concept reserved for experienced welders. It's a foundational skill. You'll encounter it early in training, and it should be something you practice consistently from day one.
The more comfortable you are with a drawing, the more productive you'll be in a shop environment. Employers value welders who can receive a set of prints and get to work without constant clarification.
Build Your Skills at the American Welding Academy
Many welding careers stall because people can weld a decent bead, but cannot interpret what the drawing is asking for. At the American Welding Academy, we include blueprint reading in our training, alongside hands-on welding and job preparation, so students build booth skills and the ability to follow real work instructions.
If you are choosing between training paths, AWA’s Pipe Welding & Fitting course and our Fabrication Welding & Fitting course are structured programs designed to prepare students for industry expectations, emphasizing skills that translate directly to the shop floor.
Ready to transform your interest in welding into professional expertise? Explore our programs, connect with us online, or call (636) 800-9353 to learn more about enrollment, program details, and how AWA can help you launch a career that lasts.